When planning our son's birthday party, we landed on the monkey theme because we call him "Monkey" all the time.  We thought our theme could be "Our Little Monkey is Turning One!"  It felt odd to plan a somewhat tropical party when everyone in the neighborhood was starting to hang Indian corn on their doors and placing bright orange pumpkins out on their front steps, but we were going for it!

I'm pretty happy with how things turned out.  We found some pretty neat decor ideas on Pinterest, which I will post below.  We bought some of the decorations and cups/plates/cutlery on Amazon. The streamers and balloons were from PartyCity.  The paper bunting was a DIY and the materials for that were from A.C. Moore.  I like A.C. Moore because they always have coupons.

Please scroll down to see the decorations we made.  I have included steps.  They are really easy to recreate.  I hope these help if you are considering a monkey theme for your little monkey's birthday. Have fun!

Burlap and Paper Bunting

You Need: Scissors, various yellow patterned card stock paper, zigzag scissors, hole puncher, burlap cording, Pre-assembled burlap bunting, letter stickers

Assembly:
I made two different bunting-style signs for the party.  One of the signs was for the entrance to the party and read, "Our Little Monkey Is 1."  The other sign was for the candy table and read, "Go Bananas."  (This party was largely a family party and only three children were present, which is why I did a candy buffet, instead of goodie bags.  If it had been a true kids' party, I would have done pre-made goodie bags.)

Step 1: Lay out all materials, including the burlap bunting (I bought 2 sets).

Step 2: Cut out 9 yellow triangles with the zigzag scissors for the "Go Bananas" sign.

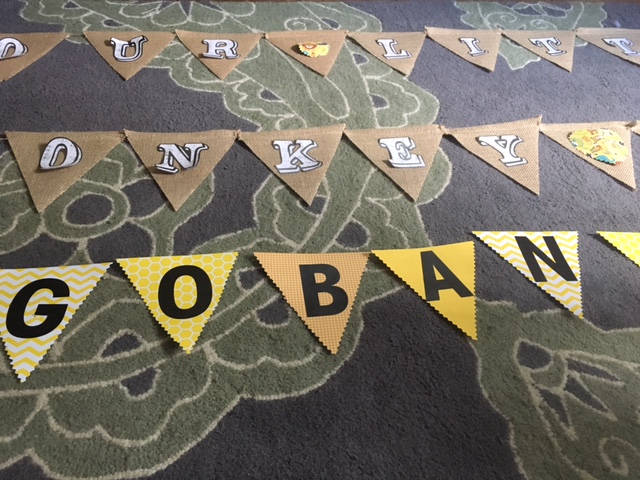
Step 3: Add the letter stickers to your bunting.  I needed an extra adhesive for the burlap. I also cut out little shapes to use as spaces on the burlap bunting. 

Step 4: Grab your trusty hole puncher and punch a hole on either side of the yellow card stock triangles. 

Step 5: Now, grab that burlap cording and thread it through the holes on the card stock triangles.  I put "Go" on one thread, and "Bananas" on the other. 

Step 6: Hang that ish up! 


Coconut Trees

You Need: Brown balloons, brown crepe paper, green construction paper, scissors, tape

Assembly:
Step 1: Take three pieces of construction paper and place them one on top of the other.  Fold the stack of paper in half.

Step 2: Cut half an oval/leaf shape. Now, cut little wave shapes along the edge of the folded half leaf shape.  (I tended to cut four or so "waves" on the side of the folded leaf.)

Step 3: Unfold the leaves, and voila! You've got coconut leaves!

Step 4: Blow up the brown balloons.

Step 5: Cut your brown crepe paper into four long streamer-like pieces.

Step 6: I usually used three to four leaves, bunched them together and taped them to the ceiling.

Step 7: Bunch three balloons together and tape under the leaves.

Step 8: Take three of the brown crepe paper streamers and tape them under the balloons.

Step 9: You've got yourself a coconut tree!

Candy Bar

You Need: A variety of glass vases for candies, candy scoops, your fabulous new "Go Bananas" bunting, a variety of yellow candies/candies with yellow wrappers, goodie bags, inflatable plastic monkeys (from Amazon)

Assembly:
Step 1: Hang bunting behind serving area.

Step 2: Inflate the monkeys and place on serving area.

Step 3: Place the vases on the serving area and fill with your yellow candies.

Step 4: Don't forget to set out the bags and scoops!


Don't forget the cake! 


The link below is a Hartford Courant article from July, but offers a current list of most of the splash pads in the state.  The majority of these splash pads are FREE.  With this crazy heat wave going on, this information is good to know!

List of CT Splash Pads

What are some of your favorite Connecticut watering holes and splash pads?
Last weekend, my in-laws visited and I wanted to make a gluten-free dessert option (my sister-in-law has a gluten allergy).  I went to the pantry and found that my gluten-free brownie mix had expired.  I tossed the mix.

I remembered seeing a recipe online for gluten-free brownies made with black beans, instead of flour. After a quick google search, I found this recipe.

It is a vegan recipe as well as being gluten-free, though I didn't make mine vegan.  Instead of using two "flax eggs", I used two regular eggs.  The brownies turned out well and were a huge hit!  I will definitely make them again!

I like that these brownies are easy to make (you just throw all the ingredients into a blender, blend, and pour into muffin tins).  If you have a child with a gluten allergy, I know they will love this dessert.

I will be visiting minimalistbaker.com for more recipes in the future.  If this recipe is any indication of how good they are, I know I will not be disappointed!


You like that "So I Married An Axe Murderer" quote!  So good!  One of my favorite films!

Anyway...

Let's rewind to our unborn baby's five month prenatal anatomy ultrasound.  My husband and I were so excited.  We were eager to learn the gender of our child and to see how he was growing.

Everything looked pretty good, barring an echogenic focus, which I'll discuss in a later post.  The technician did mention, however, that the baby was breech.  Not to worry, they assured us.  He had plenty of time to flip around.

The remaining four months of my pregnancy flew by, and before we knew it, we were in the final countdown.  I went to one of my last ultrasounds, where I was informed that the baby was still breech.  He must have been very comfortable where he was! We needed to schedule a c-section, which I will also address in a future post.

The baby was born and we were very happy to have a healthy little boy.

As time went on, we did start to notice that our son only really turned his head in one direction. Whenever he slept, he always faced the right side of his crib.  He was also developing a bit of a flat spot from always having his head in the same position.

We brought this up with the pediatrician and he said that our boy had torticollis, which is a tightening of a muscle on one side of the neck.  The doctor also told us that the flat spot was called plagiocephaly.  He said that physical therapy could help correct both things, and that the earlier invention was sought, the better.

Plagiocephaly is basically having an asymmetrical skull.  It is becoming more common in infants due to babies sleeping on their backs.  In our case, it was likely caused from his position in utero, as well as the torticollis.

We did bring our son to physical therapy every week and worked on exercises to improve his neck. We went to CCMC, which has been wonderful.  While his torticolis continued to improve, the plagiocephaly didn't.  The physical therapist recommended getting a helmet to correct the plagiocephaly.

I was not a huge fan of my son needing a helmet.  It made me feel like I had done something wrong. I also wasn't crazy about the idea of people staring at him when we were out in public, or people asking me why he had to wear a helmet.

Like I said, I wasn't crazy about the idea, but it was not about me.  It was about my son.  It was about fixing something that could affect his confidence later in life.  We were told that infants usually only need to wear the helmets for about 8 to 10 weeks anyway.  He will not remember wearing it at all.

My husband and I agreed that we should go ahead with getting a helmet.  We had to make this decision quickly because the younger a baby is, the easier it is to correct, as the bones in the skull are not yet fused.  Now we needed to decide where to go for the helmet.  We had two choices: Cranial Technologies or Hanger Clinic.

In the end, we chose to go with Cranial Technologies.  We chose CT for two big reasons.  The first reason was that this is all Cranial Technologies does.  They specialize in correcting plagiocephaly and have a good track record.  The second reason we chose them was because their version of the helmet (the Doc Band) was open at the top of the head.  We were getting into the warmer months and we thought our son would be a bit more comfortable in the Doc Band than the full helmet that Hanger offered.

The only downside of choosing Cranial Technologies was the fact that they only have two locations in the state, Madison and Cheshire.  Both locations were about an hour away from where we lived, so the weekly drives there were sometimes a pain.

Fast forward eight weeks, and our son was out of the helmet.  He is now the owner of a nice, round noggin!


I have fond memories of my grandma making "icebox cake" during the summer months. It's called icebox cake because you simply assemble the ingredients and then throw the "cake" in the icebox (fridge) for a couple of hours.

An icebox cake's ingredients can vary. I've seen a bunch of different flavor combinations that I hadn't even thought about on Pinterest.  This dessert is so easy to make and so tasty, I hope you'll check it out.

Here's my recipe:

Icebox Cake

1 1/2 bananas, sliced into rounds
Abt. 10 oz. strawberries, sliced
1 large package of vanilla pudding (I use the cook and serve, but instant would be fine), prepared as box instructs
1 1/2 tubs of Cool Whip
Graham Crackers

That's it!

All you need now is a container. A trifle dish would look pretty, but I've made this in a tupperware container too.

Start by setting down a layer of graham crackers, then smooth half of your pudding over the graham crackers.  Make sure that all the crackers are covered because when this sits in the fridge, the crackers absorb some of the moisture and that's what creates the "cake" element of this dessert.  Next, put down a layer of bananas and cover that with a layer of Cool Whip.  Repeat this whole process again, only with a strawberry layer.  You will end up with a Cool Whip layer on top.  I crush up left over graham crack and sprinkle that all over the top (It presents the lid of the container from sticking).  Pop the dessert in the fridge and let sit for a few hours.

Enjoy!


Going on a trip with an infant for the first time can seem like a major challenge, especially when it comes to packing. While packing for our first weekend away, I felt the stress level rise as our departure day approached.  I felt like there were a million and one things that needed doing.

Why was I so anxious?  I think it was just because we had never done it before.  One thing that really helped me was making lists.  Instead of listing every little thing the baby may need, I stuck to the big items that he would ACTUALLY NEED. Here's an example:

To Do:
- Pack clothes
- Pack Pump and pump accessories (bottles, nipples, lids)
- Pack jarred baby food
- Pack bowl, spoon
- Pack toys (not ALL the toys, just a few that can be hand washed)
- Pack N Play (provides a portable play/sleep space)
- DIAPERS (diaper bag)
- Bumbo (provides a portable seat for the baby when it's meal time)
- Stroller

It's pretty basic and a no-brainer, but sometimes it helps just to have a basic plan in order to ease a stressful process.

What are some baby items that you cannot imagine traveling without?


If you are nursing a baby with food sensitivities, you already know that the best foods will be cut from your diet.  When I say best foods, I mean dairy.

When I found out that my son had a sensitivity to dairy, I was happy to learn that it would be easy to fix.  The only problem with the easy fix was that it involved giving up dairy products. Nooooooo!

I love my dairy.  I love cheese, ice cream, chocolate milk (I've got the tastebuds of a child I guess), cream cheese, and yogurt.

Over the past eight months, I have tried to find dairy substitutes that don't taste like dairy substitutes.  Below is my list of delicious dairy-free alternatives:

Best Non-Dairy Cheese
Follow Your Heart Smoked Gouda Slices

Best Non-Dairy Creamer
Silk Almond Milk Creamer (I'm partial to the hazelnut flavor.)

Best Non-Dairy Yogurt
Silk Non-Dairy Yogurt (The chocolate flavored yogurt is delicious with some slivered almonds sprinkled on top.  If you want to get real crazy, add some non-dairy chocolate chips to that.  It may blow your mind.)

Best Non-Dairy Eggnog (In case you are nursing over the holidays)
Califia Farms Holiday Nog

Best Non-Dairy Cream Cheese
Kite Hill Brand (I have tried the plain and chive flavors. This blows everything else I've tried out of the water.)

Best Non-Dairy Milk
Silk Cashew Milk

Best Non-Dairy Frozen Dessert
SO Delicious Minis (Coconut Almond Bars)

Finding a good non-dairy milk is not a real challenge, there are a ton of options out there.  I was surprised that I liked the Silk brand so much.  Silk is everywhere.  I buy mine at Stop and Shop, and it's usually on sale. Finding a non-dairy cheese, on the other hand, was the hardest.

There are plenty of brands of non-dairy cheese. The problem is that they all taste like non-dairy cheese.  The non-cheese that really had me fooled was Follow Your Heart's Smoked Gouda Slices. It has a nice buttery taste, like a real Gouda.


I hope this helps anyone who can't have dairy at the moment.  If you are dairy-free and have found a non-dairy product that you want to share, please post in the comments.